
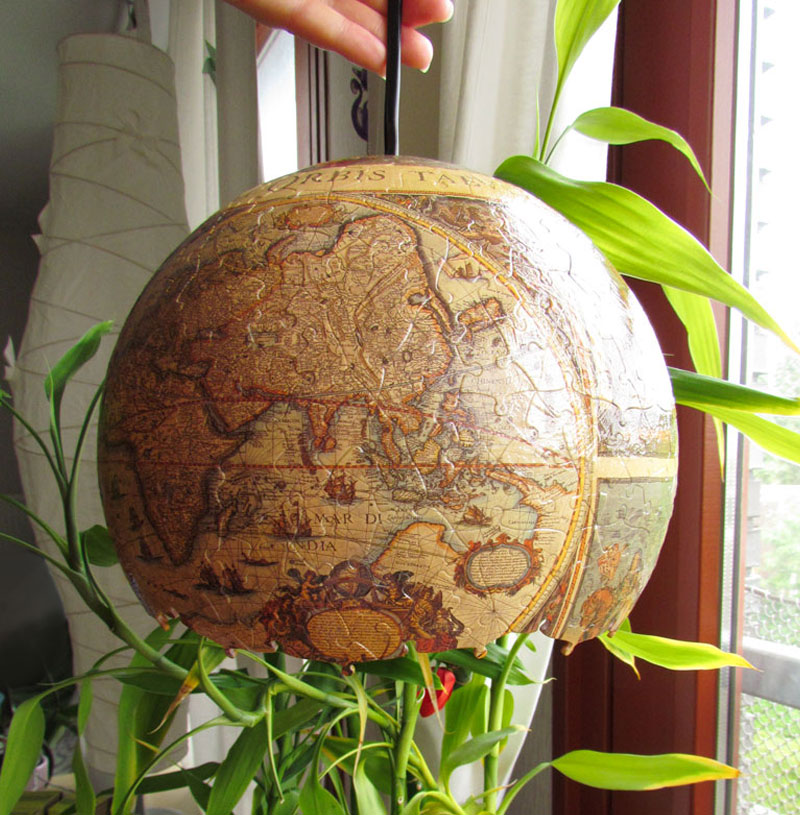
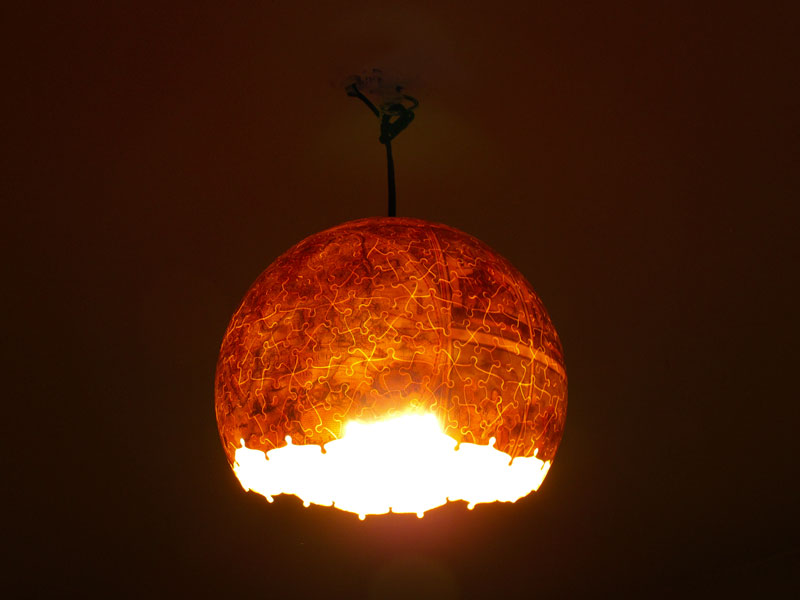
Cu ceva timp în urmă am trecut printr-o perioadă de fascinație față de puzzle-uri. Una dintre achiziții a fost o sferă puzzle. Ideea că piesele puse cap la cap pot forma o sferă mi s-a părut extrem de interesantă. E adevărat, după o anumită perioadă noutatea a dispărut și sfera nu a mai avut aceeași atracție, dar nu am avut niciodată puterea să îi dau drumul.
După cum vă puteți imagina, am găsit în final ce să fac cu ea, altfel nu v-aș povești acum despre ea. Așa că azi o să facem o lampă.
Trebuie totuși să vă avertizez. Acest proiect nu va avea o continuitate perfectă. E prima mea lampă, așa că a trebuit să modific planul inițial observând pe parcurs ceva probleme structurale. Dar haideți să purcedem la drum!
Long time ago when I was going through a puzzle phase, I bought a jigsaw puzzle sphere. The whole idea that the pieces would bond together to form a sphere made it really intriguing. Now, I don’t know about you, but after a while, the novelty of the puzzle wore off. But I never had the heart to toss it or give it away. True, it was no longer fun, however it was still quite interesting.
Now, as you can imagine, I finally figured out what to do with it! Otherwise I wouldn’t be writing about it. So here you have it: we’re going to make a lamp.
I must warn you though, the project will not have a perfect continuity. It is my first lamp, so things had to be modified as I went along and discovered that my initial plan needed a bit of reinforcing. But let’s dive in!
Materiale:
- Un puzzle în formă de sferă
- Lipici – eu am folosit Mod Podge
- Vopsea – am folosit acrilic – alb și 2 nuanțe de auriu
- Șmirghel fin
- O bormașină
- Set cablaj lampă
- Un bec – eu am folosit un LED, pentru că mi-a fost teamă că dacă emană căldură prea multă poate afecta stratul de lipici de pe sferă
- Și evident mărunțișurile adiționale: un burete, o pensulă, apă, șervețele, un bloc de lemn, carton, foarfecă, etc.
Materials:
- A puzzle sphere
- Glue – I used Mod Podge
- Paint – I used acrylic paint – white and 2 shades of gold
- Relatively fine sandpaper
- A drill
- A light fixture
- A light bulb – I used a LED light bulb as I was worried about the heat from the light affecting the glue on the shade
- And the usual: a brush, a sponge, water, napkins, a small wood block, some cardboard, a pair of scissors, etc.
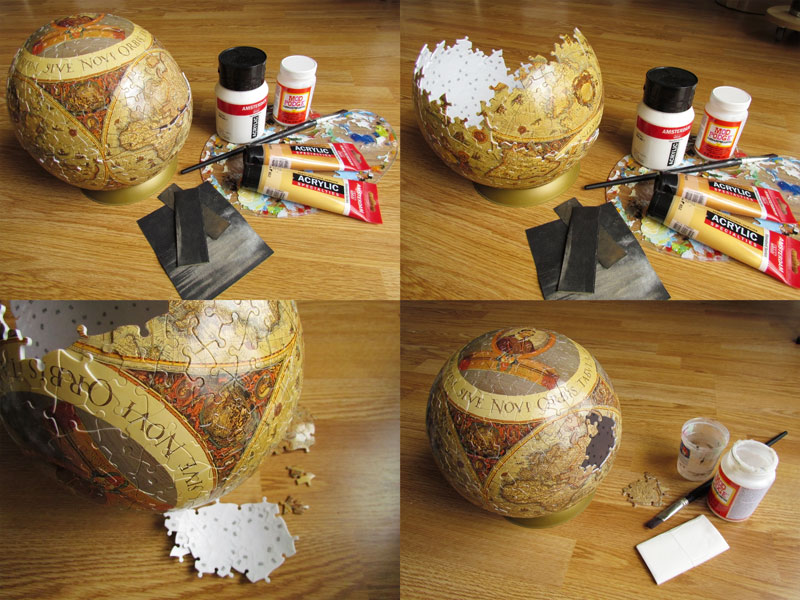
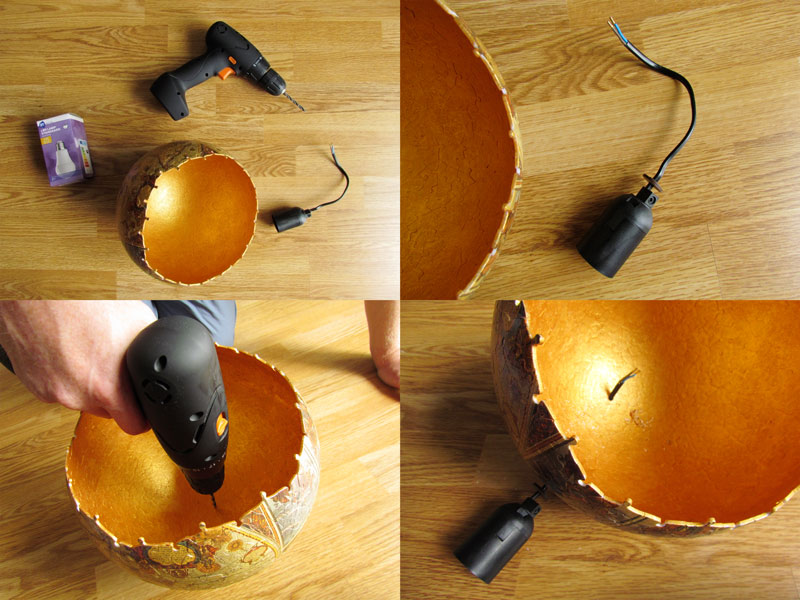
Pasul 1:
Am asamblat sfera lăsând o gaură suficient de mare pentru ca o coadă de pensulă să poată fi manevrată înăuntru pentru a ajuta la nivelarea sferei și ulterior pentru a putea înlătura porțiunea nedorită.
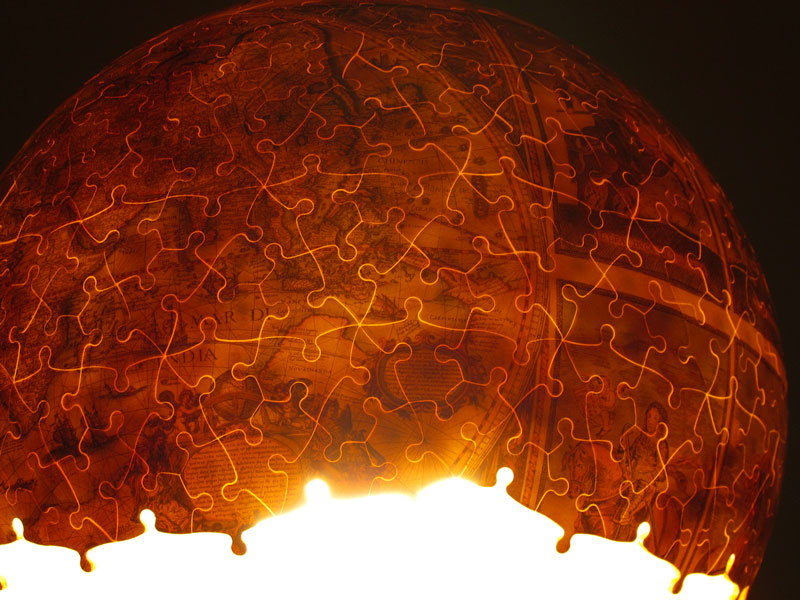
Puzzle-ul meu a avut de la început o bază de plastic pentru a putea prezenta sfera pe orice suprafață. Cu ajutorul acesteia mi-a fost foarte ușor să o țin în poziție și să pun straturi peste straturi de lipici. Mod Podge e cea mai frumoasă invenție. E un lipici minunat, ușor de folosit și de așezat în straturi. La început apare alb, dar se usucă complet transparent. Lipește și sigilează in același timp.
Pentru ca nu eram sigură cât de lungă vreau să fie lampa, am pus câteva straturi bune de Mod Podge doar pe aproximativ o treime din suprafața sferei (pornind de la ce urma să fie centrul acesteia, locul pe unde va trece cablul lămpii) ca să am o bază solidă cu care să pot lucra.
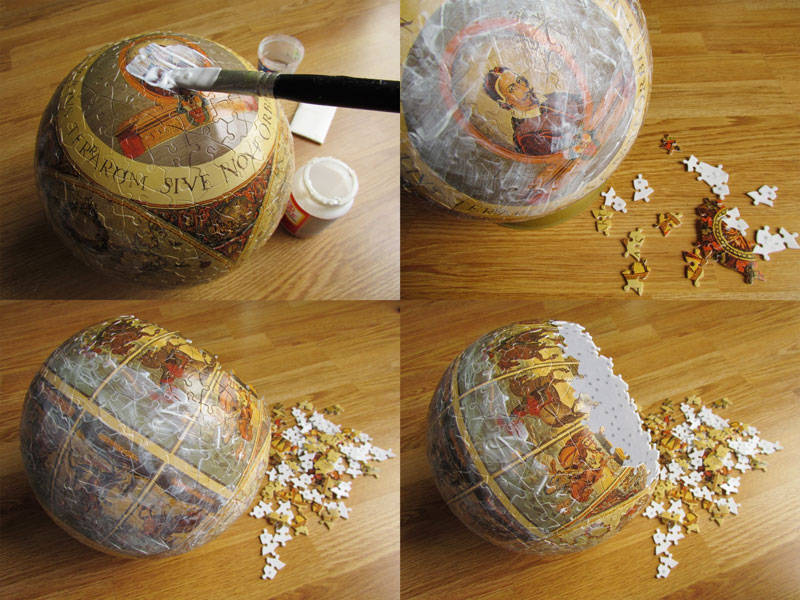
Odată lipiciul uscat, am început să scot rând cu rând din partea opusă a sferei până când am ajuns la lungimea dorită. Am pus lipici și pe restul pieselor de puzzle doar după ce am fost 100% sigură că aceea e dimensiunea dorită. Nu vă speriați, pasul acesta durează, pentru că lipiciul trebuie să fie uscat pentru a putea pune stratul următor. Cum eu nu mă grăbeam, această lampă a luat câteva săptămâni bune, în care am lucrat la ea doar când aveam câte un moment liber.
Step 1:
I have assembled the sphere, leaving a hole big enough to slide the brush or a stick in and, if needed, be able to level the puzzle pieces by putting pressure from outside while holding them in place with the brush from the inside.
My sphere came with a plastic base so it could be easily displayed. This made it really easy to hold it in place and layer the glue. Mod Podge is a wonderful creation. It is a glue that layers beautifully. At first it looks white, but it dries fully transparent. It can be used both as a glue and as a varnish.
I was not sure how long I wanted to make the lamp shade, so I added several layers of glue on about a third of the lamp (starting from what was to be the center, where the light fixture would pass through) in order for me to be able to get an idea and have a study base to work with.
Once that was done I started working on deciding the length. I kept removing layers of the pieces until I got to the right proportion. Only after I was 100% sure that that was the desired length, I layered the Mod Podge all the way on the outside of the sphere. Be warned, this step takes a while as the glue must be dry before the next layer. Personally, I wasn’t in a hurry, so this lamp took a couple of weeks of whenever I had time to work on it a little bit.
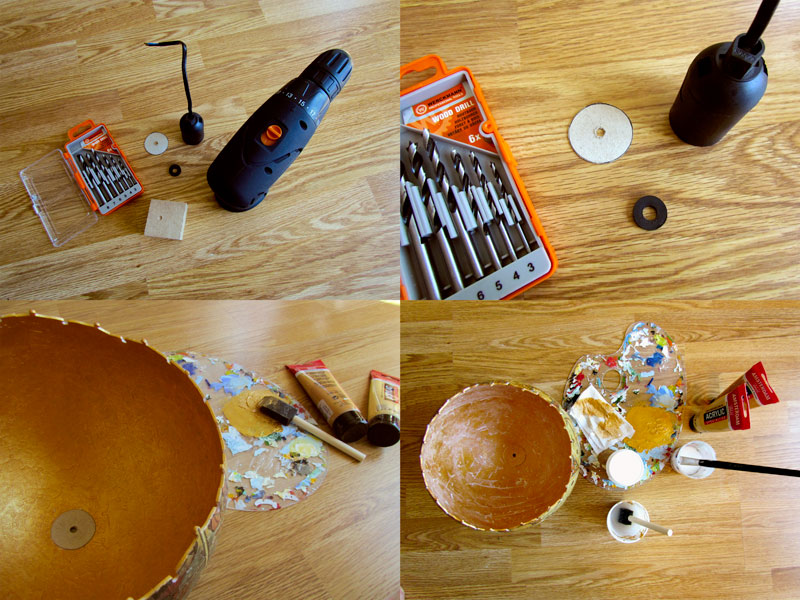
Pasul 2:
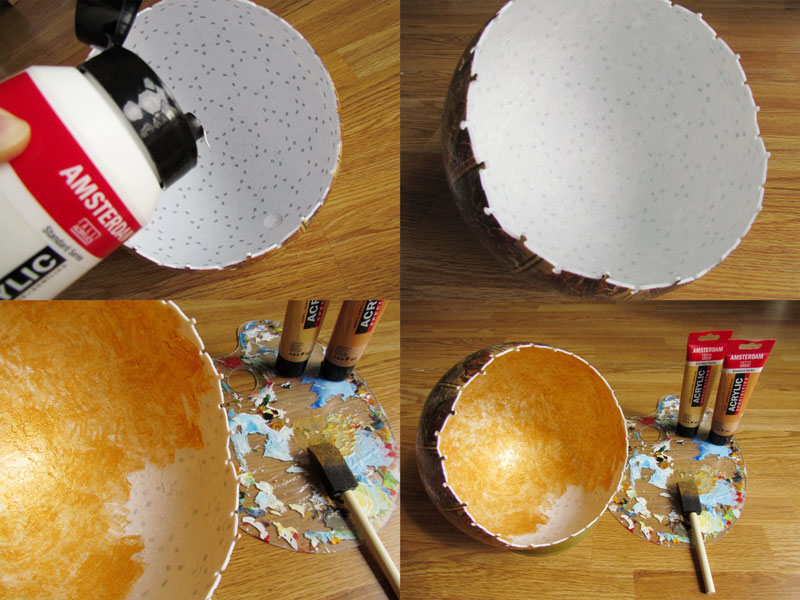
Folosind hârtia de șmirghel, am răzuit nițel sfera pe interior pentru a permite culorii să adere mai bine pe suprafața de plastic. Nu e nevoie să nivelezi stratul interior. Nu ăsta e rostul acestui pas, ci doar râcâirea suprafeței. Am curățat după aceea plasticul cu o bucată de material umed.
Am vrut să păstrez lampa relativ transparentă. Vroiam să fiu sigură că liniile de îmbinare vor fi în continuare vizibile când aceasta va fi aprinsă, așa că am adăugat ca bază doar un strat subțire de alb. Pentru culoarea finală am amestecat două nuanțe de auriu și am colorat sfera strat cu strat folosind un burete pensulă. La fel ca și în cazul lipiciului, acest pas necesită răbdare, straturi și timp.
Step 2:
I lightly sanded the inside of the sphere so as to allow the color to adhere easier and not peel off after a while. Don’t stress much about this. The idea is not to make the interior even, but to simply make the surface slightly rough. Once that was done, I took a damp cloth and cleaned up the surface so all the fine residue resulted from the sanding would not interfere with the layer of paint.
My goal was not to make the lamp shade opaque. I still wanted to see the light through where the puzzle pieces meet, so I added just 1 thin layer of white as a base. For the final color, I mixed 2 shades of gold acrylic paint and layered it using a sponge brush. The same as with the glue, this takes patience, layers and time.
Pasul 3:
Cu ajutorul unui cub de lemn și al mâinilor magice ale jumătății mele, am dat o gaură în centrul sferei folosind un burghiu de aceeași dimensiune cu lățimea cablului.
Centrul sferei a fost ușor de identificat, fiind singurul loc unde îmbinarea pieselor de puzzle forma o stea.
Step 3:
Using a small block of wood placed under the sphere and the magical help of my better half, we drilled a whole in the center of the sphere using a drill bit large enough to allow the wire from the light fixture to pass through. The center of the sphere was easily identified from the inside as that was the only spot where the pieces formed a star.
După realizarea găurii pentru cablu, am observat că piesele din zona respectivă începuseră să se miște. Lipiciul Mod Podge crease un strat compact pe exterior, foarte eficient și rezistent pe marea parte a suprafeței, însă centrul e punctul maxim de stres fizic. Cu toate ca nu avea prea multă greutate de susținut am simțit nevoia să fiu sigură.
Așa că am luat o bucată de carton și am tăiat un cerc în centrul căruia am decupat o gaură de aceeași dimensiune cu cea din sferă. Am folosit șmirghelul doar în zona centrală a sferei pentru a înlătura din vopsea și a-i permite lipiciului să adere. Am lipit cartonul având grijă să aliniez cele două găuri, iar după ce lipiciul s-a uscat am refăcut stratul de vopsea.
La final am acoperit vopseaua cu un strat subțire de lipici. Acesta o protejează și o face să lucească frumos.
Once that was done I realized that the area of the hole might have become structurally less sturdy. The Mod Podge had created a bonding layer on the outside which was enough for most of the surface, but the center spot is physically where all the stress is. It did not have a lot of weight to hold, but still, I wanted to be sure it would be fine.
So, I took a piece of cardboard, cut a circle and then removed the centre by cutting a hole as big as the one drilled in the shade. I slightly sanded down the sphere in the center so as to remove some of the acrylic and allow the glue a better bonding surface. I glued the piece of cardboard in the center, making sure that the holes align, and painted it over once the glue was dry.
As a finishing touch I added a layer of Mod Podge on the inside to seal the color and make it hold better in time. As an added bonus, it now shines brighter.
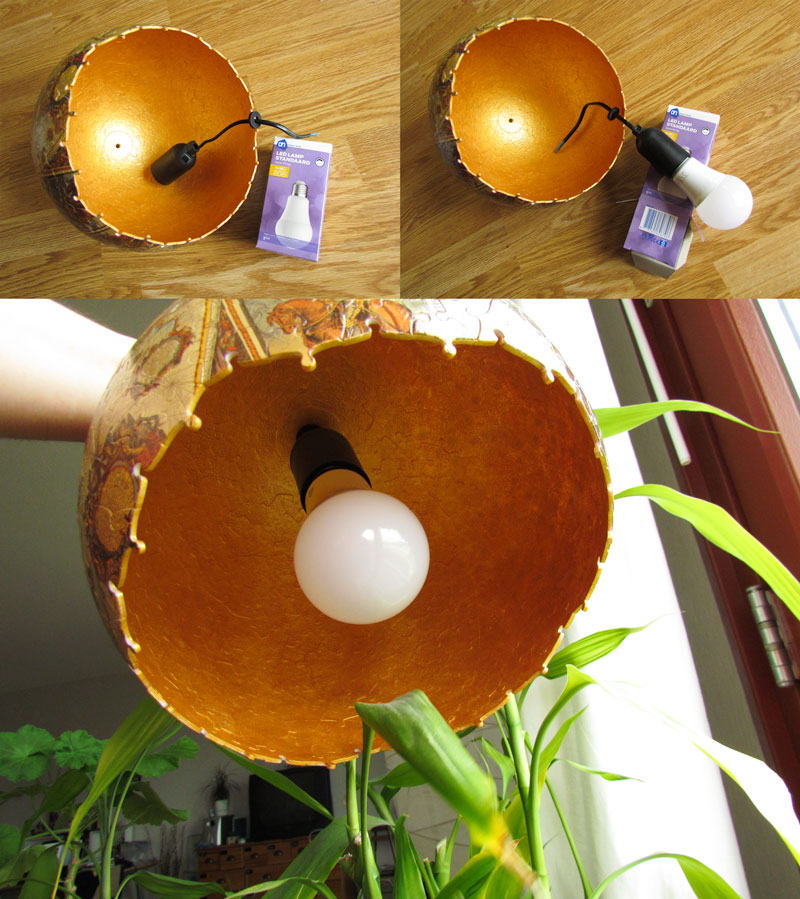
Pasul 4:
Pe cablajul de lampă am adăugat un element de cauciuc pentru a crea o distribuție cât mai eficientă a greutății. Iar la final am adăugat becul (pe care să vă spun drept l-am scos și adăugat abia după ce am instalat lampa în tavan). Inițial am vrut să folosesc un element metalic pentru a separa cablul și lampa, dar nu am găsit unul cu dimensiunea potrivită. Nu mi-am făcut prea mari griji din acest motiv pentru că lampa e ușor de dat jos și piesa poate fi oricând înlocuită.
Step 4:
I added the light fixture. I used also a thick rubber spacer between the shade and the light fixture. I initially wanted to use a metal one, however I could not find one with the right dimensions. I was not really worried about that as it can literally be replaced any time a better piece comes along. (I did take out the light bulb and put it back only after the lamp had been properly installed in its place.)
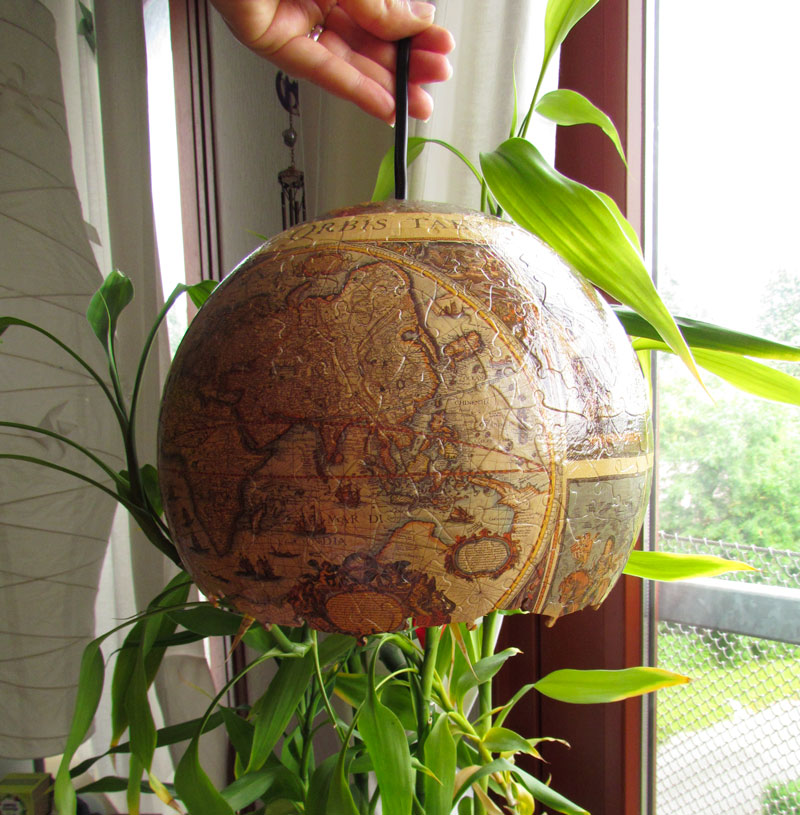
După ce am asamblat toate piesele, mi-am rugat încă o dată asistentul de încredere să îmi ofere o mână de ajutor pentru a agăța lampa și evident pentru ca eu să pot face 500 de mii de poze în timpul acestui proces. Și gataaaa!
After the light bulb was added, I once again used the help of my better half to install the lamp in the desired spot while I behaved like a true paparazzi and took thousands of pictures. Tadaaaa!
În concluzie:
Locul în care vroiam inițial să o instalăm nu a mers. Ea a fost gândită pentru un spațiu mult mai mic, în holul apartamentului. Încercând să o montăm, am descoperit că ar fi fost lovită în permanență de ușa de la intrare. Ca să nu o lovescă ar fi trebuit agățată la 2 cm de tavan ceea ce arăta foarte urât și făcea să se piardă design-ul. Am decis în schimb să o montăm în sufragerie pentru a-i putea face poze. Când am aprins lumina, am avut o stare de debusolare completă. Nu-mi plăcea și eram dezamăgită. Am continuat totuși să-i fac poze, cocoțată fiind pe canapea, încercând să îi găsesc cel mai bun unghi și cea mai decentă lumina. Vreo 20 de poze mai târziu am realizat că începe să-mi placă, ceea ce m-a făcut să sap și mai tare să văd de fapt ce nu-mi convine. Și am înțeles.
E o lampă mică, dar cu o intensitate mare. Farmecul ei e designul. Așezată în tavan, se pierde. Are prea multă suprafața albă, prea mult spațiu pe care nu îl poate umple. În schimb va arăta fantastic agățată pe un cablu lung, plasată aproape de nivelul ochilor și cu un bec de intensitate mai slabă pentru a nu acoperi atât de puternic farmecul ei.
Nu o pot folosi în acest apartament, dar în alt spațiu, cu cablul potrivit, va fi vedetă.
In conclusion:
Initially we had planned to place it in the hallway, which is a relatively narrow space. Trying to hook it up, we realized that the door would have bumped into it every single time. The only solution would have been to place it literally 2 cm from the ceiling. That close to the ceiling it was losing its entire design charm. We decided instead to temporary have it in the living room so I could take pictures. However, when I turned the light on, I was stunned by the fact that I did not like it. I did continue to take pictures, trying to find its best angle. About 20 pictures later I noticed I started to like it, and that made me search even more for what felt off. And then it made sense!
It is a small lamp, with a high intensity. Its charm is in its design. Up there on the ceiling it gets lost. There is far too much space that it needs to fill up. On the other hand, on a long cable, placed almost at eye sight level and with a less bright light bulb it will look fantastic.
I don’t have the space to use it in this apartment, however in a different space, with the right gear, it will be the belle of the ball.


Fără comentarii